How to Remove Unwanted Objects from Photos Without Retouching

A photo remover is a tool that erases unwanted people, objects, text or marks from an image and fills the gap with matching background, usually in a few seconds. Many now run on AI, so you brush over the distraction, and the software rebuilds what should be behind it. The method that works best is the one that touches only the distraction and leaves everything else, especially your face, exactly as the camera recorded it.
That last point matters more than most tutorials admit. Removing a lamp post is a cleanup. Smoothing your skin or reshaping your jaw is retouching, and it changes how you look to the people who meet you afterward. This guide covers how object removal works, which tools to use, how to get clean results, and where the line sits between tidying a photo and altering the person in it.
What Does a Photo Remover Actually Do?
A photo remover identifies the pixels you select and replaces them with a prediction of what the scene would look like without them. Older tools copied nearby texture, which is why clone-stamp edits often left repeating patterns. Current AI tools analyze the whole scene, including lighting, perspective and surface texture, and generate new pixels that blend in.
The practical result depends on how complex the background is. A stranger standing against a plain sky or a smooth wall disappears almost invisibly. A stranger standing in front of a tiled facade, a crowd, or a detailed fence is harder, because the tool has to invent structure that makes geometric sense.
Three terms you will see across these tools mean roughly the same thing:
- Object eraser or magic eraser: brush over the item and release.
- Generative fill: select an area and let AI generate replacement content.
- Inpainting: the technical name for filling a masked region based on its surroundings.
Retouching vs. Removing: Where the Line Sits
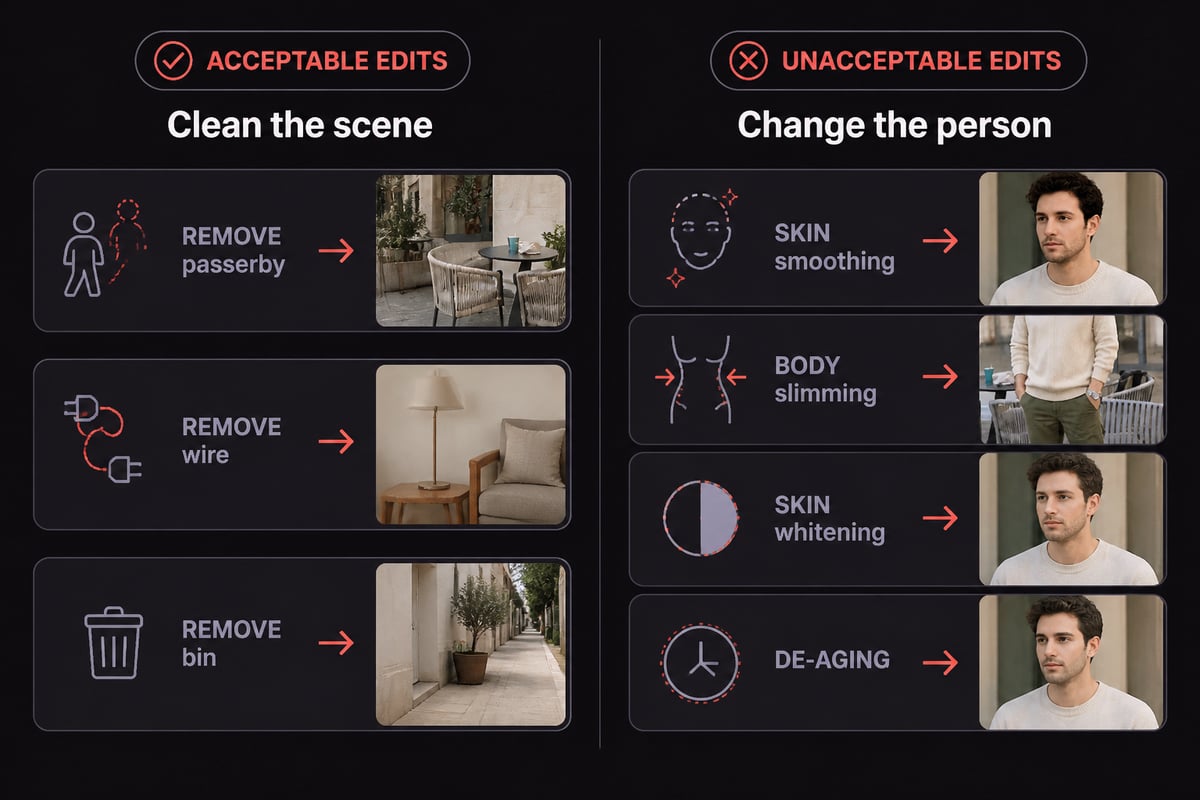
Removing an object changes the scene around you, while retouching changes you. This is the distinction that decides whether your edited photo is still honest.
Cleaning a scene is generally safe for a profile photo. Taking out a passing cyclist, a power line, a stray bag or a parking sign leaves you looking exactly as you do in person. Retouching is different: skin smoothing, slimming, teeth whitening, wrinkle removal and eye enlarging all alter the face and body that someone will compare against when they meet you.
For dating profiles in particular, a photo that makes a first meeting feel like a mismatch costs you trust immediately. CMeIn's own guidance on this leans toward keeping the person unaltered, which is covered in its piece on choosing dating profile photos that feel like you.
A simple test helps. If a friend who knows you well would notice the change when comparing the edit with the original, you have crossed from removal into retouching.
Which Tools Remove Objects From Photos?
Several mainstream tools handle object removal well, and you probably already own one. Your choice depends on your device and how much control you want.
| Tool | Where it runs | Best use |
|---|---|---|
| Apple Photos Clean Up | iPhone, iPad, Mac | Quick fixes on photos already in your library |
| Photoshop Remove tool | Desktop and web | Precise control and difficult backgrounds |
| Online magic eraser sites | Browser | One-off removals with no software installed |
| Phone gallery erasers | Android and others | Fast cleanup on the device where you shot it |
Apple Photos Clean Up
Apple describes Clean Up as an Apple Intelligence feature in Photos that removes distracting objects from a photo. It has hardware requirements: an iPhone 16 model, iPhone 15 Pro or Pro Max, an iPad with A17 Pro or M1 or later, or a Mac with M1 or later, running at least iOS 18.1, iPadOS 18.1 or macOS Sequoia 15.1. If your device qualifies, it is a low-friction option because there is nothing to upload.
Photoshop's Remove tool
Photoshop's Remove tool lets you brush over an area or draw a loop around it, and Adobe recommends a brush slightly larger than the thing you are removing. It also offers Generative AI on, Generative AI off and Auto modes, and Adobe states that using the tool does not deduct generative credits. The off mode is useful when you want a texture-based fill rather than newly generated content.
Browser-based erasers
Online magic eraser sites ask you to upload an image, paint over the unwanted element, and download the result. They suit occasional use. Check what the site does with your upload before using a personal photo, particularly one showing your face.
How to Remove an Object From a Photo, Step by Step
The process is nearly identical across tools: select the distraction, let the software fill it, then inspect the result. Following the same order every time prevents most bad edits.
- Start with the highest-resolution original. Compressed screenshots and messaging-app copies give the tool less detail to match.
- Zoom in before selecting. A tight, accurate selection produces a cleaner fill than a rough swipe.
- Cover the object plus its shadow. A removed person whose shadow remains looks obviously edited.
- Brush slightly beyond the edge. Adobe's advice to use a brush a little larger than the target exists because tight masks leave a halo.
- Run the removal, then zoom to 100 percent. Check edges, repeating textures, and straight lines such as railings or horizons.
- Remove large items in stages. Take out one section, accept it, then handle the next. One huge selection forces the tool to guess too much.
- Save as a new file. Keep the untouched original so you can retry.
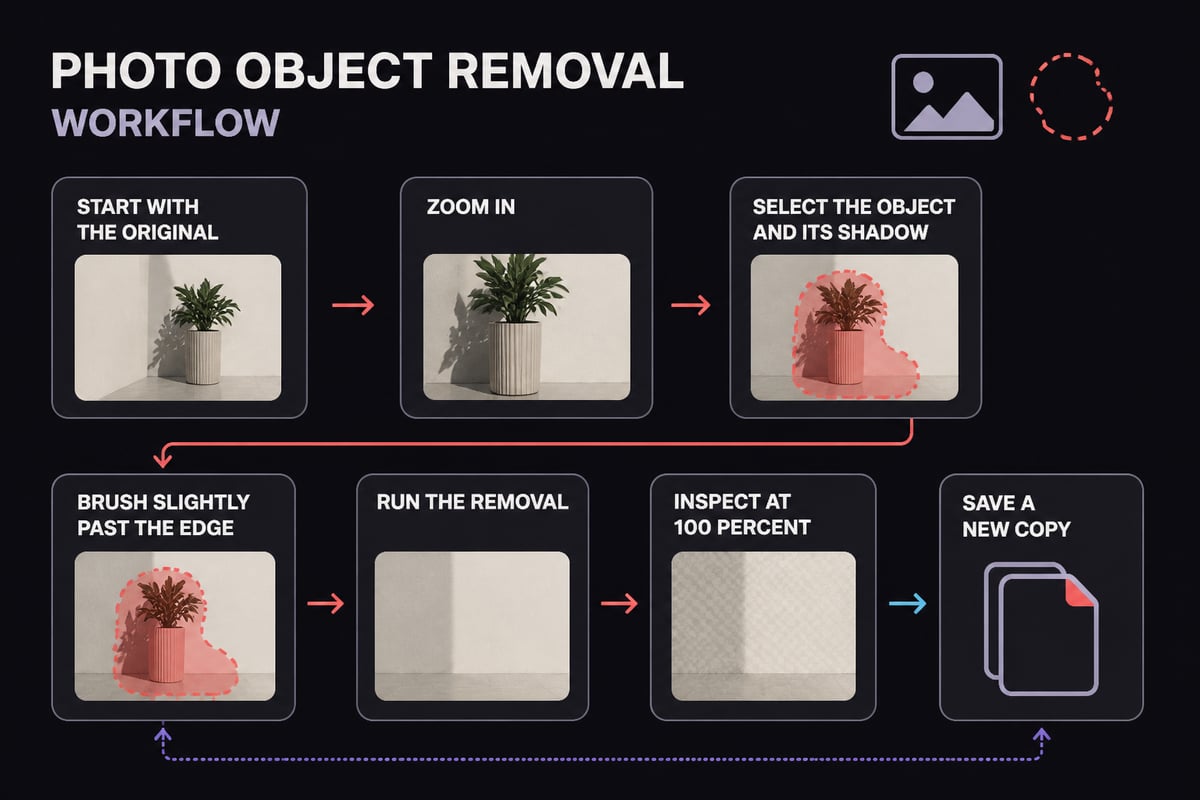
Adobe's own tutorial on removing unwanted objects with generative fill walks through selecting the object and reviewing the generated result. Checking the output at full size is worth the extra few seconds, since the first result is not always the best one.
What Can You Safely Remove?
Most distractions come off cleanly if they sit on a simple or repeating background. Knowing which categories are easy and which are risky saves you time.
Usually easy:
- Passersby in the background of a travel shot
- Stray cables, power lines and wires across a sky
- Signs, trash cans, cones and parked vehicles
- Dust, scratches and stains on a scanned print
- Small marks on a wall or table
Moderate difficulty:
- Text, logos and watermarks over detailed textures
- Harsh glare or reflections on glass and water
- Shadows falling across patterned ground
Hard, and often not worth attempting:
- Anything overlapping your own face or body
- People in dense crowds with overlapping limbs
- Objects that cover most of the frame
A note on watermarks: remove them only from images you own or have permission to edit. Stripping a photographer's watermark from their work is a rights problem, not a technical one.
How to Get Clean Results With a Photo Remover
A photo remover gives its best results when you control the input, so a few habits matter more than any setting. These apply whichever tool you use.
Mind the light. If the removed object cast light or shadow on its surroundings, the fill has to account for it. Remove the shadow along with the object, then check the nearby ground for a leftover lighter or darker patch.
Watch straight lines. Horizons, door frames and fence rails are where AI fills most often fail, producing a slight bend or a break. If a line shifts, undo and redo the selection in smaller pieces.
Avoid over-erasing. Removing four or five items from one frame can leave a scene that feels oddly empty or sterile. Keep the elements that give the place its character.
Check the edges of your own body. When a removal sits near your arm, hair or shoulder, zoom in on that boundary. A fill that nibbles at your outline can subtly change your silhouette.
Compare against the original. Flip between the two versions. Any change to your face, skin or proportions that you did not intend is a signal to undo and reselect more carefully.

Is It Honest to Edit a Dating or LinkedIn Photo?
Removing background clutter is widely considered fine, while altering your appearance is not. Context sets the standard, because a dating photo and a professional headshot are both judged against the person who turns up.
For dating apps, the purpose of the photo is accurate first impressions. Taking a stranger out of the corner of a beach photo does not mislead anyone. Whitening, slimming, or aging yourself down does. The same logic applies to a LinkedIn headshot: a clean background supports a professional impression, while a face that no longer resembles you creates an awkward moment at the first video call.
Recency matters alongside editing. A perfectly cleaned photo from a decade ago is still misleading, which CMeIn addresses in its guide on how old dating profile photos can be.
What If You Have No Good Photo to Clean Up?
Sometimes the problem is not a distraction in the frame but the lack of a usable frame at all. Many people have a camera roll full of group shots, blurry candids and selfies in poor light, and no amount of object removal fixes a photo that was never good to begin with.
One option is a new photo of you in a better setting. Another is generating images from your own reference photos, so the scene is built around you rather than cleaned up around you. CMeIn takes this second route: it generates realistic images of you in settings such as dating profiles, social media and travel, built from your reference photos. The service aims to keep your likeness without retouching, so the result still represents you accurately.
If you want to understand how this works before trying it, CMeIn explains the basics in its article on how to create AI photos of yourself, and its guide to AI photos that look authentic covers what separates a believable result from an obviously synthetic one.
Privacy deserves a direct check with any service that handles your face. CMeIn states that uploads are private by default and never used to train models. Pricing structure is worth comparing too. CMeIn has no subscription: you buy a credit pack and pay only for what you generate.
Common Mistakes When Using a Photo Remover
Most failed edits come from a short list of avoidable errors. Catching them early keeps the result believable.
- Working on a low-resolution copy. A thumbnail or screenshot gives the AI too little to match.
- Leaving the shadow behind. The object is gone but its dark patch remains.
- Selecting too large an area at once. Large fills invite visible repetition and warped geometry.
- Ignoring reflections. A person removed from a street scene can still appear in a shop window or a car door.
- Trusting the preview. A fill that looks fine fitted to the screen often shows smears at full size.
- Overwriting the original. Always save an edited copy so you can start over.
When Should You Reshoot Instead?
Reshoot when the removal touches your face, covers a large share of the frame, or leaves the scene looking unnatural after two or three attempts. At that point, the time spent fixing the image exceeds the time a better photo would take.
A few signs that a reshoot is the smarter move:
- The distraction overlaps your hair, hands or face
- Several people stand close behind you, and the fill keeps creating odd shapes
- The lighting is flat or harsh enough that the photo would be weak even after cleanup
- You are using it for a first impression, such as a profile, where a stronger image pays off
For posing and presence on a reshoot, CMeIn's notes on how to pose for photos and how to look confident in photos give practical starting points.
Frequently Asked Questions
Is a photo remover free?
Many are. Apple's Clean Up is built into compatible devices, and many browser tools offer free basic removal, often with resolution limits or watermarks on the output. Photoshop requires an Adobe plan.
Will removing an object lower image quality?
The filled area is newly generated, so it may be slightly softer or have different grain than the rest of the photo. Working from the original file and zooming to check at 100 percent helps you catch it.
Can a photo remover take out a person standing next to me?
It can, but results vary. If the person overlaps your arm, hair or clothing, the tool must guess at your outline, which risks altering your shape. A reshoot is safer in that case.
Can AI-edited photos be detected?
Sometimes. Mismatched texture, warped lines and inconsistent shadows are the usual giveaways. CMeIn discusses detection more broadly in can people tell if a photo is AI.
Open your most recent photo of yourself, zoom in on the background, and remove one distraction at a time, saving each edit as a new copy so the original stays intact. If the shot itself is the problem and you would rather have a new image that still looks like you, CMeIn can generate realistic photos from your own references in the settings you choose, so start with your photos and see how closely the results match the person people will actually meet.